# Replacing thermal interfaces on GMKtec EVO-X2 ### Preparation :::info # Watching this video might help to understand the basics https://www.youtube.com/watch?v=HMTy3jQc39A ([mirror](https://www.reddit.com/r/GMKtec/comments/1km6tn8/evox2_teardown/)) ::: #### Tools Required - PTM7950 (30x30mm, 0.2-0.25 mm thick) or Noctua NT-H2 (or something similar, don't go lower) - Phillips-head screwdriver (small and small-ish) - Isopropyl alcohol (90%+ recommended, 70% is okay) - Lint-free cloth or coffee filter - Optional: electrical tape, 0.5 mm thermal pads (Gelid GP Ultimate or better, around 80x40 mm) #### Safety Precautions - Ensure device is powered off and power cable is disconnected - Work on a static-free surface - Keep track of all screws - consider using a tray ### Step-by-Step Instructions #### Disassembly 1. Turn the device upside down and remove both rubber feet. 2. Unscrew the 2 screws from the smaller section of the case and carefully remove it: 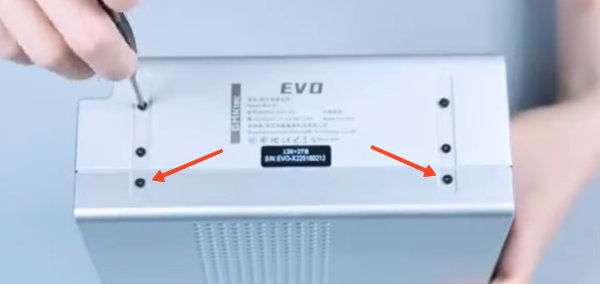 3. Locate and remove the tape sealing the heatsink to the blowers (the one that is on the side could be left as is): 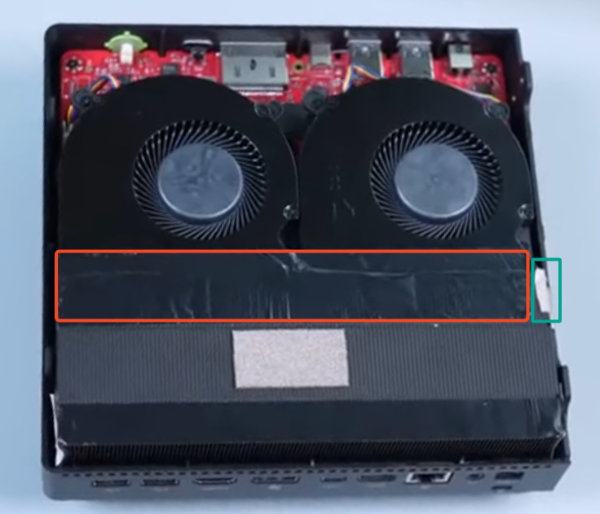 #### Blower Removal 4. Unscrew 3 screws from each blower: 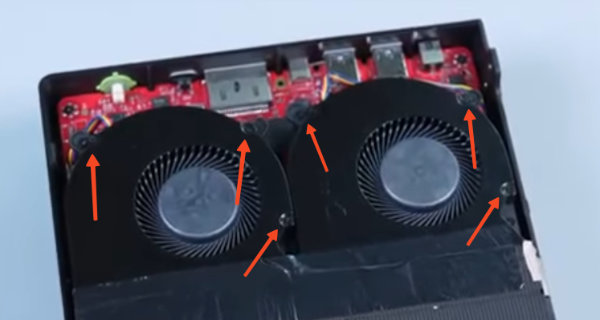 5. Gently move the blowers to the sides (no need to disconnect them). #### Heatsink Removal 6. Remove the 2 small screws securing the sides of the heatsink. 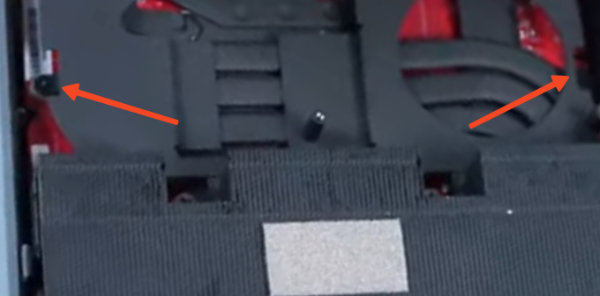 7. **IMPORTANT**: Gradually loosen the 4 spring-loaded screws holding the heatsink in a cross pattern (diagonal sequence), turning each screw only 1-2 rotations at a time:  8. Once all screws are loose, **gently** rock the heatsink side to side to break the thermal paste seal. 9. Carefully lift the heatsink up and away from the APU. Note the small tape on the side if you didn't remove it. #### Cleaning and Preparation 10. Clean the old thermal paste from the APU using isopropyl alcohol and a lint-free cloth. 11. **CAUTION**: Be extremely careful around the small capacitors near the APU - avoid excessive cleaning in these areas, it's okay if there is still some thermal paste on these parts (marked with red):  12. Allow the APU to dry completely (a couple of minutes). #### Applying New Thermal Solution 13. Apply your new thermal interface: - Follow application guides for your specific product - Detailed application guide for PTM7950 - https://help.moddiy.com/en/article/how-to-apply-honeywell-ptm7950-bm6825/ 14. Verify all thermal pads for RAM and VRMs are present and properly positioned. Optionally replace RAM thermal pads as well. #### Reassembly 15. Carefully align and place the heatsink back onto the APU. 16. Secure the heatsink by tightening the 4 spring-loaded screws in a diagonal pattern, doing only 1-2 rotations per screw. Don't worry about overtightening them, they have a mechanical stop, you'll feel it. 17. Reattach the 2 small screws on the sides of the heatsink. 18. Return the blowers to their original positions and secure with their 6 screws. 19. Replace the sealing tape between the heatsink and blowers (if it's too damaged, electrical tape is fine). 20. Reattach the case cover and secure with the 2 screws. Start with the side opposite to where the screws are, it should be a tight fit, putting it in place at an angle helps. 21. Replace the rubber feet. ### Testing After reassembly, boot the device and monitor temperatures to ensure proper cooling performance. ### Relevant Pages - [[Hardware/PCs/GMKtec-EVO-X2]] - [[Hardware/Boards/Sixunited-AXB35]]