Blame
| ec6207 | deseven | 2025-06-25 13:30:10 | 1 | # Replacing thermal interfaces on GMKtec EVO-X2 |
| 2 | ||||
| 3 | ### Preparation |
|||
| 4 | ||||
| 5 | :::info |
|||
| 6 | # Watching this video might help to understand the basics |
|||
| 7 | https://www.youtube.com/watch?v=HMTy3jQc39A ([mirror](https://www.reddit.com/r/GMKtec/comments/1km6tn8/evox2_teardown/)) |
|||
| 8 | ::: |
|||
| 9 | ||||
| 10 | #### Tools Required |
|||
| 11 | - PTM7950 (30x30mm, 0.2-0.25 mm thick) or Noctua NT-H2 (or something similar, don't go lower) |
|||
| 12 | - Phillips-head screwdriver (small and small-ish) |
|||
| 13 | - Isopropyl alcohol (90%+ recommended, 70% is okay) |
|||
| 14 | - Lint-free cloth or coffee filter |
|||
| 3999e4 | deseven | 2025-07-02 09:16:40 | 15 | - Optional: electrical tape, 0.5 mm thermal pads (Gelid GP Ultimate or better, around 80x40 mm) |
| ec6207 | deseven | 2025-06-25 13:30:10 | 16 | |
| 17 | #### Safety Precautions |
|||
| 18 | - Ensure device is powered off and power cable is disconnected |
|||
| 19 | - Work on a static-free surface |
|||
| 20 | - Keep track of all screws - consider using a tray |
|||
| 21 | ||||
| 22 | ### Step-by-Step Instructions |
|||
| 23 | ||||
| 24 | #### Disassembly |
|||
| 25 | 1. Turn the device upside down and remove both rubber feet. |
|||
| 75c724 | deseven | 2025-07-01 20:48:27 | 26 | 2. Unscrew the 2 screws from the smaller section of the case and carefully remove it: |
| 27 | 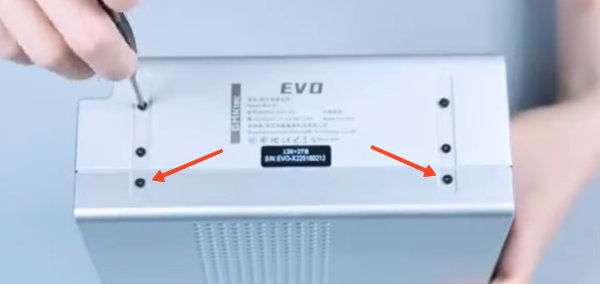 |
|||
| 28 | 3. Locate and remove the tape sealing the heatsink to the blowers (the one that is on the side could be left as is): |
|||
| 29 | 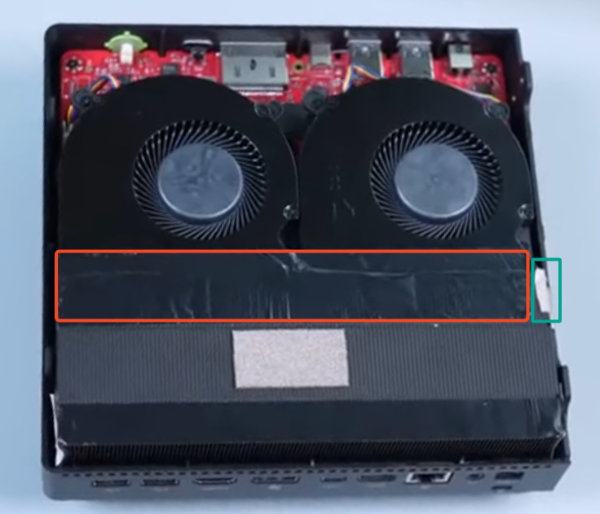 |
|||
| ec6207 | deseven | 2025-06-25 13:30:10 | 30 | |
| 31 | #### Blower Removal |
|||
| 75c724 | deseven | 2025-07-01 20:48:27 | 32 | 4. Unscrew 3 screws from each blower: |
| 33 |  |
|||
| ec6207 | deseven | 2025-06-25 13:30:10 | 34 | 5. Gently move the blowers to the sides (no need to disconnect them). |
| 35 | ||||
| 36 | #### Heatsink Removal |
|||
| 75c724 | deseven | 2025-07-01 20:48:27 | 37 | 6. Remove the 2 small screws securing the sides of the heatsink. |
| 38 | 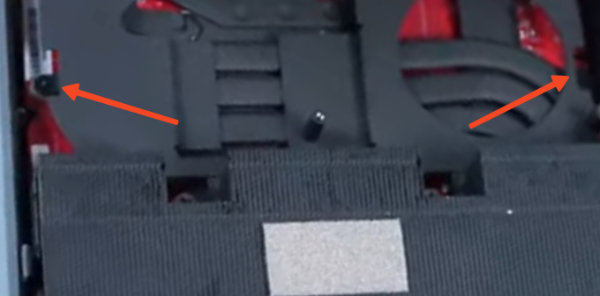 |
|||
| 39 | 7. **IMPORTANT**: Gradually loosen the 4 spring-loaded screws holding the heatsink in a cross pattern (diagonal sequence), turning each screw only 1-2 rotations at a time: |
|||
| 40 | 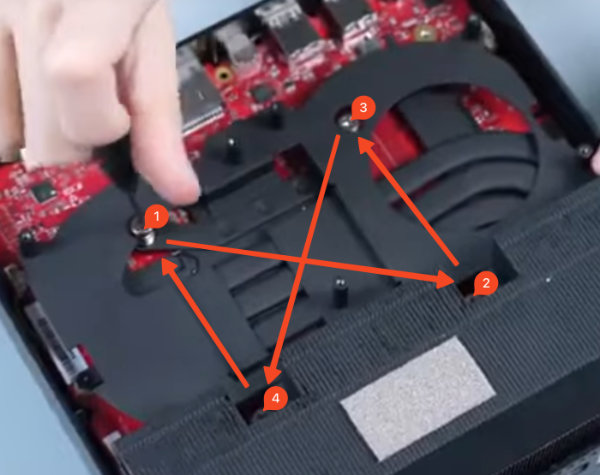 |
|||
| ec6207 | deseven | 2025-06-25 13:30:10 | 41 | 8. Once all screws are loose, **gently** rock the heatsink side to side to break the thermal paste seal. |
| b8e6cd | deseven | 2025-08-26 10:29:04 | 42 | 9. Carefully lift the heatsink up and away from the APU. Note the small tape on the side if you didn't remove it. |
| ec6207 | deseven | 2025-06-25 13:30:10 | 43 | |
| 44 | #### Cleaning and Preparation |
|||
| 45 | 10. Clean the old thermal paste from the APU using isopropyl alcohol and a lint-free cloth. |
|||
| 673330 | deseven | 2025-09-12 07:40:53 | 46 | 11. **CAUTION**: Be extremely careful around the small capacitors near the APU - avoid excessive cleaning in these areas, it's okay if there is still some thermal paste on these parts (marked with red): |
| 75c724 | deseven | 2025-07-01 20:48:27 | 47 | 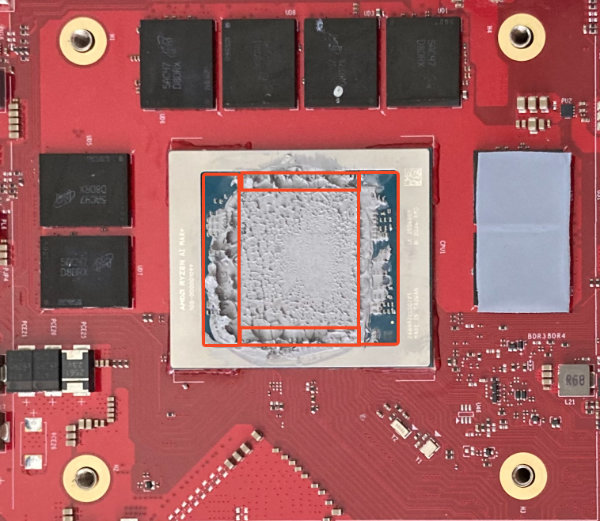 |
| ec6207 | deseven | 2025-06-25 13:30:10 | 48 | 12. Allow the APU to dry completely (a couple of minutes). |
| 49 | ||||
| 50 | #### Applying New Thermal Solution |
|||
| 51 | 13. Apply your new thermal interface: |
|||
| 3999e4 | deseven | 2025-07-02 09:16:40 | 52 | - Follow application guides for your specific product |
| 06d85f | deseven | 2025-09-02 08:30:42 | 53 | - Detailed application guide for PTM7950 - https://help.moddiy.com/en/article/how-to-apply-honeywell-ptm7950-bm6825/ |
| ec6207 | deseven | 2025-06-25 13:30:10 | 54 | 14. Verify all thermal pads for RAM and VRMs are present and properly positioned. Optionally replace RAM thermal pads as well. |
| 55 | ||||
| 56 | #### Reassembly |
|||
| 57 | 15. Carefully align and place the heatsink back onto the APU. |
|||
| 2420d9 | deseven | 2025-06-25 13:53:09 | 58 | 16. Secure the heatsink by tightening the 4 spring-loaded screws in a diagonal pattern, doing only 1-2 rotations per screw. Don't worry about overtightening them, they have a mechanical stop, you'll feel it. |
| ec6207 | deseven | 2025-06-25 13:30:10 | 59 | 17. Reattach the 2 small screws on the sides of the heatsink. |
| 60 | 18. Return the blowers to their original positions and secure with their 6 screws. |
|||
| 61 | 19. Replace the sealing tape between the heatsink and blowers (if it's too damaged, electrical tape is fine). |
|||
| bf47b3 | deseven | 2025-07-01 20:25:23 | 62 | 20. Reattach the case cover and secure with the 2 screws. Start with the side opposite to where the screws are, it should be a tight fit, putting it in place at an angle helps. |
| ec6207 | deseven | 2025-06-25 13:30:10 | 63 | 21. Replace the rubber feet. |
| 64 | ||||
| 65 | ### Testing |
|||
| 66 | After reassembly, boot the device and monitor temperatures to ensure proper cooling performance. |
|||
| 67 | ||||
| 68 | ### Relevant Pages |
|||
| 69 | - [[Hardware/PCs/GMKtec-EVO-X2]] |
|||
| 70 | - [[Hardware/Boards/Sixunited-AXB35]] |